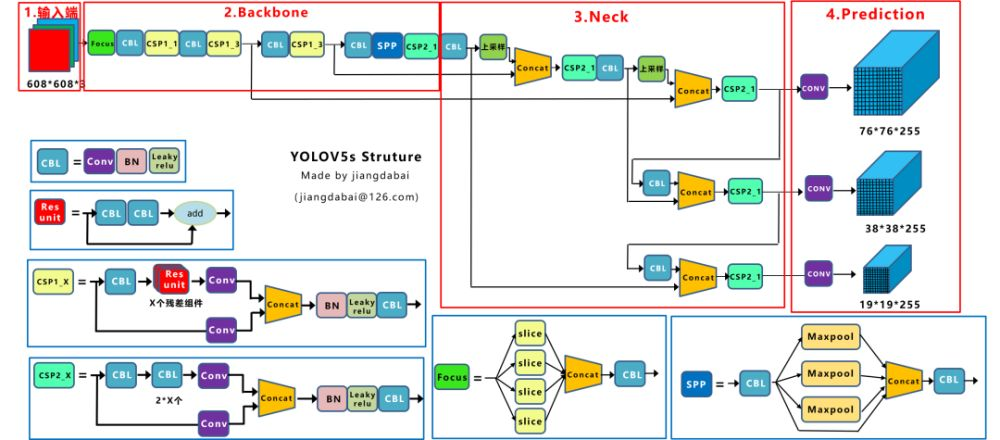
1.YOLOv5算法原始head结构

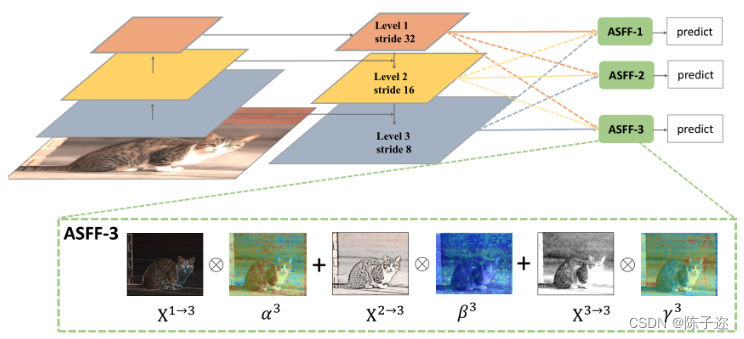
YOLOv5模型的Neck部分使用的是FPN+PAN结构,FPN是针对多尺度问题提出的,FPN结构是自上而下并且横向连接的,它利用金字塔的形式对尺度不同的特征图进行连接,将高层特征和低层特征进行融合。FPN与PAN结合,对来自不同骨干层的不同检测层进行参数聚合。这种组合虽然有效提高了网络的特征融合能力,但也会导致一个问题,即PAN结构的输入全部是FPN结构处理的特征信息,而骨干特征提取网络部分的原始特征信息存在一部分丢失。缺乏参与学习的原始信息很容易导致训练学习的偏差,影响检测的准确性。

从neck特征融合入手,引入加权双向特征金字塔BiFPN来加强特征图的底层信息,使不同尺度的特征图进行信息融合,从而加强特征信息。

2.BiFPN原理与结构
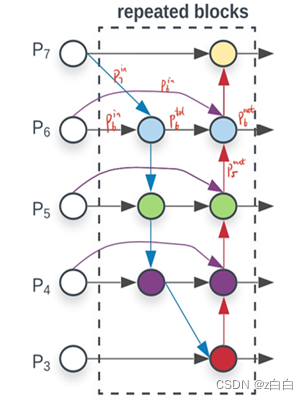
BiFPN是一种改进版的FPN网络结构,主要用于目标检测任务。该结构是加权且双向连接的,即自顶向下和自底向上结构,通过构造双向通道实现跨尺度连接,将特征提取网络中的特征直接与自下而上路径中的相对大小特征融合,保留了更浅的语义信息,而不会丢失太多的深层语义信息。

传统的特征融合时将尺度不同的特征图以相同权重进行加权,但是当输入的特征图分辨率不同时,以相同的权重进行加权对输出的特征图不平等。所以BiFPN根据不同输入特征的重要性设置不同的权重,同时反复采用这种结构来加强特征融合。

BiFPN结构中的加权融合方式采用快速归一化融合(Fast normalized fusion),该融合方式是针对训练速度慢提出的,将权重放缩至0~1范围内,因没有使用Softmax方式,所以训练速度很快。跨尺度连接通过添加一个跳跃连接和双向路径来实现,自此实现了加权融合和双向跨尺度连接。

传统的特征融合往往只是简单的 feature map 叠加/相加 (sum them up),比如使用concat或者shortcut连接,而不对同时加进来的 feature map 进行区分。然而,不同的输入 feature map 具有不同的分辨率,它们对融合输入 feature map 的贡献也是不同的,因此简单的对他们进行相加或叠加处理并不是最佳的操作。所以这里我们提出了一种简单而高效的加权特融合的机制。
常见的带权特征融合有三种方法:
image.png

BiFPN结构如图所示
image.png

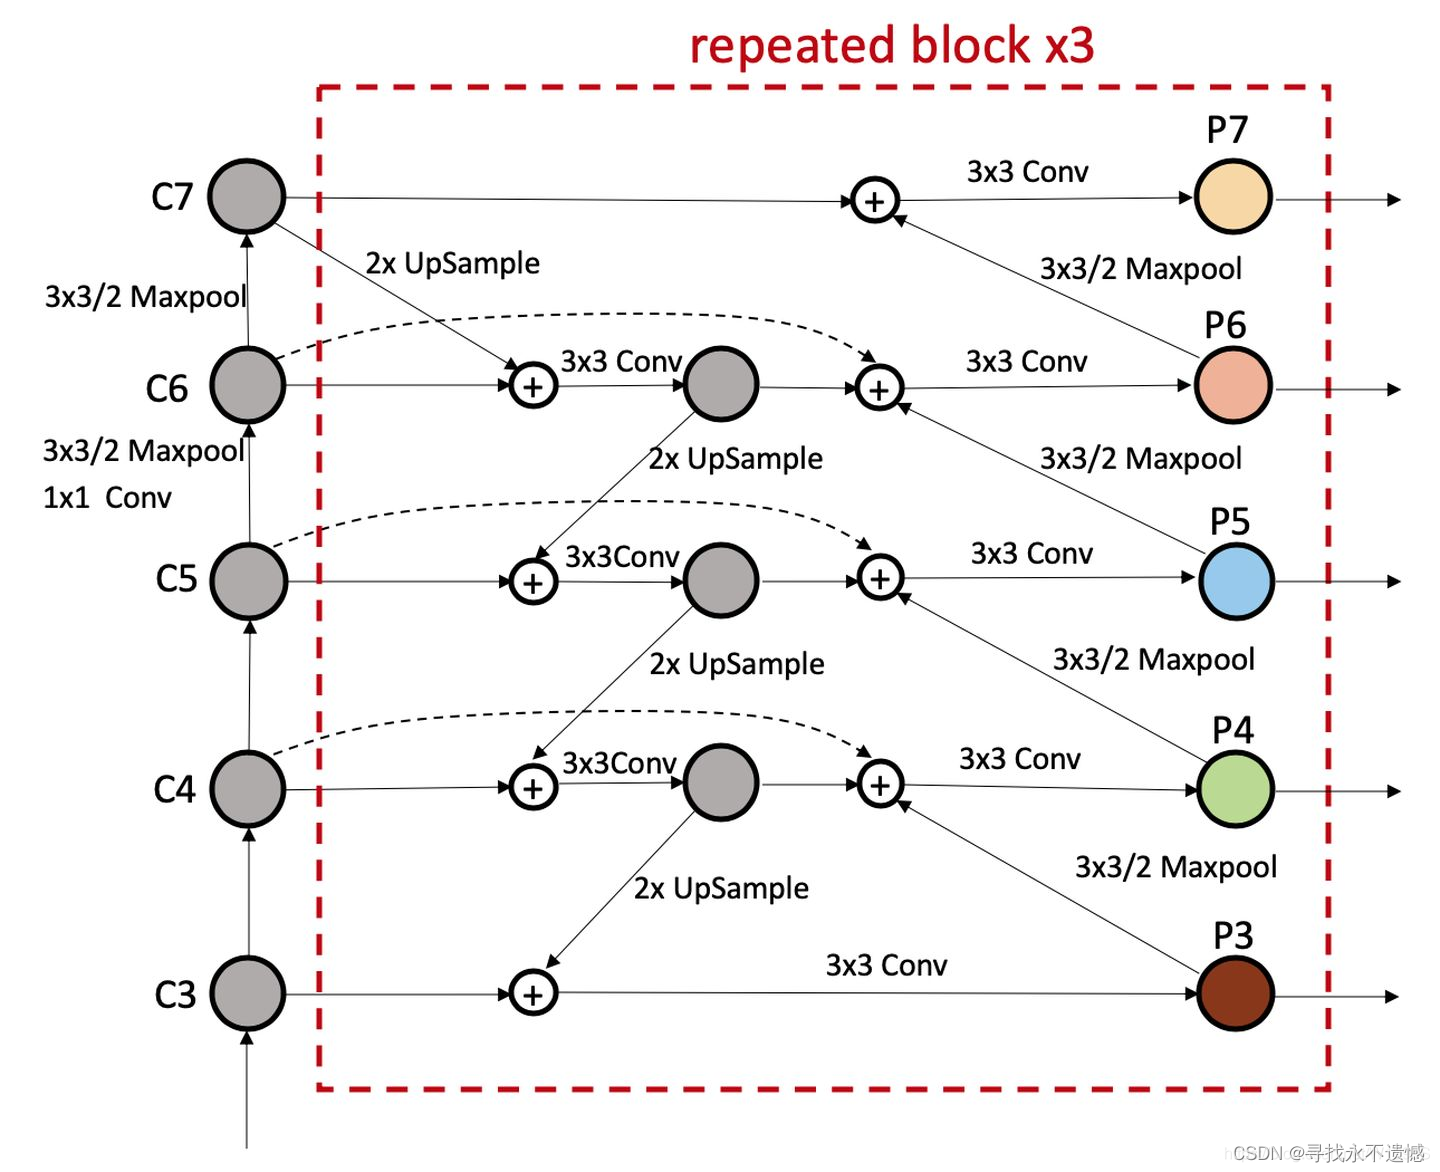
详细结构图如下:
image.png
从这张图可以看出图中有三个分支与两个分支融合,对应下面的代码部分

与只有一个自顶向下和一个自底向上路径的PANet不同,我们处理每个双向路径(自顶向下和自底而上)路径作为一个特征网络层,并重复同一层多次,以实现更高层次的特征融合。如下图EfficientNet 的网络结构所示,我们对BiFPN是重复使用多次的。而这个使用次数也不是我们认为设定的,而是作为参数一起加入网络的设计当中,使用NAS技术算出来的。
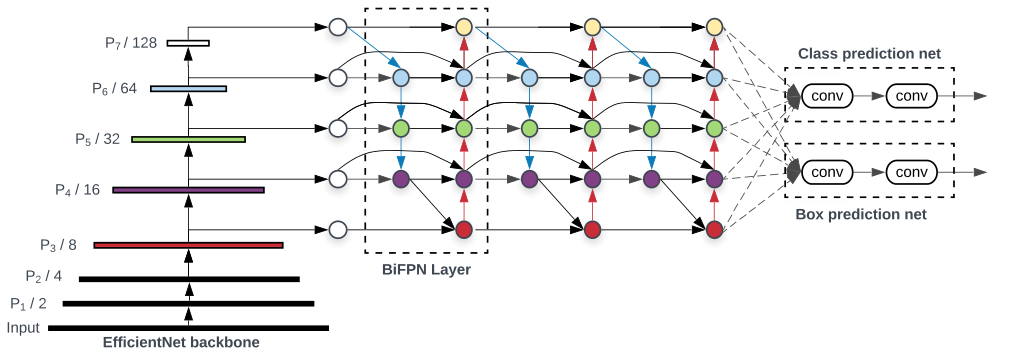
image.png

根据上面可以看出,BiFPN其实就是融合了FPN与PAN并增加了跳跃连接来获取浅层信息,所以对于小目标检测效果比较好。

3.代码与文件修改

在Common.py中添加定义模块(Concat)

[BiFPN]
1
2
3
4
5
6
7
8
9
10
11
12
13
14
15
16
17
18
19
20
21
22
23
24
25
26
27
28
29
30
31
32
33
34
35
36
# 结合BiFPN 设置可学习参数 学习不同分支的权重
# 两个分支concat操作
class BiFPN_Concat2(nn.Module):
def __init__(self, dimension=1):
super(BiFPN_Concat2, self).__init__()
self.d = dimension
self.w = nn.Parameter(torch.ones(2, dtype=torch.float32), requires_grad=True)
self.epsilon = 0.0001
# 设置可学习参数 nn.Parameter的作用是:将一个不可训练的类型Tensor转换成可以训练的类型
parameter
# 并且会向宿主模型注册该参数 成为其一部分 即model.parameters()会包含这个parameter
# 从而在参数优化的时候可以自动一起优化

def forward(self, x):
w = self.w
weight = w / (torch.sum(w, dim=0) + self.epsilon) # 将权重进行归一化
# Fast normalized fusion
x = [weight[0] * x[0], weight[1] * x[1]]
return torch.cat(x, self.d)


# 三个分支concat操作
class BiFPN_Concat3(nn.Module):
def __init__(self, dimension=1):
super(BiFPN_Concat3, self).__init__()
self.d = dimension
self.w = nn.Parameter(torch.ones(3, dtype=torch.float32), requires_grad=True)
self.epsilon = 0.0001

def forward(self, x):
w = self.w
weight = w / (torch.sum(w, dim=0) + self.epsilon) # 将权重进行归一化
# Fast normalized fusion
x = [weight[0] * x[0], weight[1] * x[1], weight[2] * x[2]]
return torch.cat(x, self.d)

修改yolov5s.yaml

BiFPN_Concat本质是add操作,不是concat操作,因此,BiFPN_Concat的各个输入层要求大小完全一致(通道数、feature map大小等),因此,这里要修改之前的参数[-1, 13, 6],来满足这个要求:
-1层就是上一层的输出,原来上一层的输出channel数为256,这里改成512
13层就是这里[-1, 3, C3, [512, False]], # 13
这样修改后,BiFPN_Concat各个输入大小都是[bs,256,40,40]
最后BiFPN_Add后面的参数层设置为[256, 256]也就是输入输出channel数都是256

[魔改]
1
2
3
4
5
6
7
8
9
10
11
12
13
14
15
16
17
18
19
20
21
22
23
# YOLOv5 head
head:
[[-1, 1, Conv, [512, 1, 1]],
[-1, 1, nn.Upsample, [None, 2, 'nearest']],
[[-1, 6], 1, BiFPN_Concat2, [1]], # cat backbone P4
[-1, 3, C3, [512, False]], # 13

[-1, 1, Conv, [256, 1, 1]],
[-1, 1, nn.Upsample, [None, 2, 'nearest']],
[[-1, 4], 1, BiFPN_Concat2, [1]], # cat backbone P3
[-1, 3, C3, [256, False]], # 17 (P3/8-small)

[-1, 1, Conv, [256, 3, 2]],
[[-1, 14,6], 1,BiFPN_Concat3, [1]], # cat head P4
[-1, 3, C3, [512, False]], # 20 (P4/16-medium)

[-1, 1, Conv, [512, 3, 2]],
[[-1, 10], 1, BiFPN_Concat2, [1]], # cat head P5
[-1, 3, C3, [1024, False]], # 23 (P5/32-large)

[[17, 20, 23], 1, Detect, [nc, anchors]], # Detect(P3, P4, P5)
]

3.将类名加入进去,修改yolo.py
models/yolo.py中的parse_model函数中搜索elif m is Concat:语句,在其后面加上BiFPN_Concat相关语句

[魔改]
1
2
3
4
# 添加bifpn_concat结构
elif m in [Concat, BiFPN_Concat2, BiFPN_Concat3]:
c2 = sum(ch[x] for x in f)

4. 修改train.py

[魔改]
1
2
3
4
5
6
7
8
9
10
11
12
13
14
15
16
17
18
19
20
21
22
23
24
25
26
27
28
29
#调用模块
from models.common import BiFPN_Concat2, BiFPN_Concat3

#向优化器器中添加BiFPN的权重参数
pg0, pg1, pg2 = [], [], [] # optimizer parameter groups
for k, v in model.named_modules():
# hasattr: 测试指定的对象是否具有给定的属性,返回一个布尔值
if hasattr(v, 'bias') and isinstance(v.bias, nn.Parameter):
pg2.append(v.bias) # biases
if isinstance(v, nn.BatchNorm2d):
pg0.append(v.weight) # no decay
elif hasattr(v, 'weight') and isinstance(v.weight, nn.Parameter):
pg1.append(v.weight) # apply decay

elif isinstance(v, BiFPN_Concat2) and hasattr(v, 'w') and isinstance(v.w, nn.Parameter):
pg1.append(v.w)
elif isinstance(v, BiFPN_Concat3) and hasattr(v, 'w') and isinstance(v.w, nn.Parameter):
pg1.append(v.w)


if opt.adam:
optimizer = optim.Adam(pg0, lr=hyp['lr0'], betas=(hyp['momentum'], 0.999)) # adjust beta1 to momentum
else:
optimizer = optim.SGD(pg0, lr=hyp['lr0'], momentum=hyp['momentum'], nesterov=True)

optimizer.add_param_group({'params': pg1, 'weight_decay': hyp['weight_decay']}) # add pg1 with weight_decay
optimizer.add_param_group({'params': pg2}) # add pg2 (biases)
logger.info('Optimizer groups: %g .bias, %g conv.weight, %g other' % (len(pg2), len(pg1), len(pg0)))
del pg0, pg1, pg2

最后为了方便测试模型配置文件是否正确、模型是否能够正确进行前向传播,以及查看模型的detect层输出,自己就编写了这个函数

[打印模型参数]
1
2
3
4
5
6
7
8
9
10
11
12
13
14
15
16
17
18
19
20
21
22
23
24
25
26
27
28
29
30
31
32
33
34
35
36
37
38
39
40
41
42
43
44
45
46
47
48
49
50
51
52
53
54
55
56
57
58
59
60
import argparse
import os
import torch
import yaml

from models.yolo import Model

# 指定要使用的GPU
os.environ['CUDA_VISIBLE_DEVICES'] = '0'


def parse_opt(known=False):
parser = argparse.ArgumentParser()
parser.add_argument('--cfg', type=str,
default='models/yolov5s.yaml',
help='model.yaml path')
parser.add_argument('--hyp', type=str, default='data/hyps/hyp.scratch-high.yaml',
help='hyperparameters path')

opt = parser.parse_known_args()[0] if known else parser.parse_args()
return opt


def main(opt):
with open(opt.hyp, encoding='utf-8', errors='ignore') as f:
hyp = yaml.safe_load(f) # load hyps dict 字典形式

# 如果配置文件中有中文,打开时要加encoding = 'utf-8'参数
with open(opt.cfg, encoding='ascii', errors='ignore') as f:
cfg = yaml.safe_load(f) # model dict 取到配置文件中每条的信息

nc = cfg['nc'] # 获取数据集的类别数
device = torch.device('cuda:0') if torch.cuda.is_available() else 'cpu'
print(f'device: {device}')
# input_img = torch.zeros(size=(1, 3, 1280, 1280))
input_img = torch.zeros(size=(1, 3, 640, 640))
input_img = input_img.to(device, non_blocking=True).float()
print(f'the model of \'{opt.cfg}\' is :')
model = Model(opt.cfg, ch=3, nc=nc, anchors=hyp.get('anchors')).to(device) # create
output = model(input_img)

print(f'number of detect layers: {len(output)}')
print('Detect head output: ')
# print(f'P2/4: {output[len(output) - 4].shape}')
print(f'P3/8: {output[len(output) - 3].shape}')
print(f'P4/16: {output[len(output) - 2].shape}')
print(f'P5/32: {output[len(output) - 1].shape}')

'''
3
torch.Size([1, 3, 80, 80, 85])
torch.Size([1, 3, 40, 40, 85])
torch.Size([1, 3, 20, 20, 85])
'''


if __name__ == '__main__':
opt = parse_opt()
main(opt)

pytorch获取模型某一层参数名及参数值方式

1
2
3
4
5
6
7
8
9
10
11
12
13
14
15
16
17
18
19
20
21
22
23
24
25
26
27
28
29
30
31
32
33
34
35
36
37
38
39
40
41
import os
import torch
import torch.nn as nn

# 设置GPU
os.environ['CUDA_VISIBLE_DEVICES'] = '1'
device = torch.device('cuda:0') if torch.cuda.is_available() else 'cpu'

# 创建模型
model = nn.Sequential(nn.Conv2d(3, 16, kernel_size=1),
nn.Conv2d(16, 3, kernel_size=1))
model.to(device)

# 方法一
# 打印某一层的参数名
for name in model.state_dict():
print(name)
# 直接索引某一层的name来输出该层的参数
print(model.state_dict()['1.weight'])

# 方法二
# 获取模型所有参数名和参数值 存储在list中
params = list(model.named_parameters())
# 分别索引得到某层的名称和参数值
print(params[2][0]) # name
print(params[2][1].data) # data

# 方法三
# 依次遍历模型每一层的参数 存储到dict中
params = {}
for name, param in model.named_parameters():
params[name] = param.detach().cpu().numpy()
print(params['0.weight'])

# 方法四
# 遍历模型的每一层 查找目标层 输出参数值
for layer in model.modules():
# 打印Conv2d层的参数
if (isinstance(layer, nn.Conv2d)):
print(layer.weight)